
Are you dreading gearing up for your first day back after winter break?
If your kids are like mine, they will need some encouragement to get back into the routines.
We will have to review rules and what it means to be respectful, responsible and productive all over again.
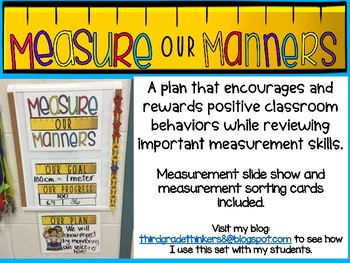
My plan is to reinforce positive behaviors with a classroom incentive that will also help me reinforce math measurement skills.
In my county and state, I am responsible for teaching students measurement concepts. My third graders need to learn about both standard and metric units of length, weight, and capacity. That includes inches, feet, yards, centimeters, meters, cups, pints, quarts, gallons, milliliters, liters, ounces, pounds, grams and kilograms!
If your kids are like mine, they will need some encouragement to get back into the routines.
We will have to review rules and what it means to be respectful, responsible and productive all over again.
My plan is to reinforce positive behaviors with a classroom incentive that will also help me reinforce math measurement skills.
In my county and state, I am responsible for teaching students measurement concepts. My third graders need to learn about both standard and metric units of length, weight, and capacity. That includes inches, feet, yards, centimeters, meters, cups, pints, quarts, gallons, milliliters, liters, ounces, pounds, grams and kilograms!
Wow, that's a lot of information to keep straight in their little brains.
I can totally understand why my students get these units confused!
We only get a matter of weeks to cover our measurement unit....certainly NOT enough time.
In an effort to figure out a way I could review and reinforce these measurement concepts on an ongoing basis, I came up with "Measuring our Manners".

.
With this plan, I got to monitor, encourage and reward my students' positive classroom behaviors while reinforcing measurement concepts. I love it when I can maximize my teaching time and integrate learning. This did just that, and my kids were very motivated and engaged throughout it all.
Here's how it worked.
First I created a chart that we would hang in our classroom. It included an area to record our goal, plan and progress. I laminated the cards so we could use a dry erase marker to write on it and I hung it in the classroom.

Our first "Measure Our Manners" goal was to build a chain that measured one meter in length.
I explained the goal to my students and we reviewed how long a meter was. I have a slide show that I use with visuals of all the measurement units. We would refer to that a lot.
Students would show me how long the chain would be....their body benchmark is their arms opened wide. Then I explained that to build the chain, they would need to use their positive behaviors.
We are a PBIS school and we focus on being productive, respectful and responsible.
Measuring our Manners is a whole class behavior tracking plan, so students would need to work as a team to remind each other of how everyone should be behaving. Students would be rewarded with a link to add to the chain as I witnessed positive behavior in action. Before beginning, we also talked about what problems we may have along the way. They recognized that they needed to work on their voice level and so we made that our goal. We discussed how we could appropriately remind each other about using a lower level voice if needed.
We added a part/part/whole box to the chart to help us keep track of our goal, how far we got, and how much further we had to go.
Then we were ready to measure our manners!
Here is what our chart looked like after awhile.

Students could earn a link for a positive morning session, lunch time, and afternoon session. I would also add a link for other random acts of goodness during the day such as if they received a compliment from another teacher or if the class worked extra hard on a school job.
We measured the chain once a day, either at the end or beginning of the day. A student would get picked to figure out the new numbers for the part/part/whole box.
That was also the time we reviewed the measurement unit.

When we met our goal and the chain measured one meter, we would get to vote on a class celebration! We kept these simple, like extra recess, bring a stuffed animal to class, eat lunch outside, etc. My kids always had lots of ideas. Once they even chose to have nap time!
I was certainly on board with that one!!!
After the first goal was reached, we planned another one.
We ended up measuring our manners using all the measurement units.
Kids never got tired of it!
We used unifix cubes to build a yard.

We got out our balance scale to measure 100 grams.

We traded out gram weights for ten or twenty grams along the way.
Our toucan kept reminding us that "you can" do it!

We even measured our manners using capacity.
Each good behavior was a cup of water added to our gallon jug.

This ended up being a review of science too. After spring break, we came back to find that we had less water in the jug then when we left. There was all kinds of speculation...NO, no one came into the classroom and drank it!
We finally figured out that some of the water had evaporated!
Good review of the water cycle!

There are other ways to measure manners too....You could add pennies to a jar until you reached a dollar. How about adding degrees on a thermometer until you reach a certain temperature.
You will find lots of opportunities for meaningful math talk.
Students engaged in lots of good math discussions through using this system.
We answered questions like:
If each link is 2 centimeters long, how many days would it take for us to reach our goal?
How many more cups do we need to make a gallon?
I used this system to reward my class for positive behaviors, but also would hold them accountable for negative ones too. There were times when the class had to subtract instead of add units.
I found that kids began to hold kids accountable. No one wanted to be the one to cause us to take away a cup, a gram or a link. Situations like this created opportunities for us to discuss ways we could help and support each other in using good behavior.
I've added this file to my TPT store.
It includes the "Measuring our Manners" printables, a measurement unit slide show and measurement sorting cards.
Click the link below if interested:
Are you looking for a way to teach the metric system?
I explain my approach in a blog post.
Check this link out to read all about it...
Teaching the Metric System
I explain my approach in a blog post.
Check this link out to read all about it...
Teaching the Metric System


 youngdor8@gmail.com


